
Written by Rob Ainslie | Last Updated 6/6/2020
Estimated time to complete: 1 hour
Watch an overview of the tutorial components and finished product
Overview and Setup
The overall goal of this tutorial is to show how to use Integromat to send data to the HubSpot Timeline API. This implementation has many use cases, so for this tutorial, we will use Google Sheets as a sample app trigger, but the integration trigger could be any app or other integraton source.
For the specific use case, imagine a scenario where webinar attendees are added to a Google Sheet and you want to log that on the HubSpot Timeline. The benefit of the HubSpot Timeline API is that you can maintain the many-to-one relationship of ‘webinar attendance’ to Contact.
Integromat is a low-cost but powerful integration platform as a service (iPaaS), which this tutorial uses because of one particular feature that is available in their free tier that is typically only available in most other Enterprise grade iPaaS systems - that feature is the ability to create an arbitrary oAuth connection. Why is that important? Read on!
The HubSpot Timeline API is a ‘platform’ level API that is typically only available to HubSpot integrators that create developer apps. All developer-based apps must utilize oAuth as the authentication method (as opposed to key based authentication using a specific portal’s HAPI key). oAuth is great because it allows a user to authorize an app to their portal without sending passwords or one-size-fits-all API keys directly to the integrator. Though oAuth is more secure than using integration keys, it also requires overhead and technical know-how to set up. Luckily, Integromat takes care of most of the heavy lifting, allowing us to easily use powerful APIs without having to code at all! Nice!
This tutorial will follow these steps. Read on for the specifics:
- Create an Integromat account. Sign up here
- Create a new Integromat Scenario and authorize Google Sheets
- Create a HubSpot Developer account, create an app, then set up an oAuth based connection in Integromat
- Create the scaffolding for the data transfer (Google Sheet with columns, HubSpot Timeline Event template)
- Finish setting up the Integromat Scenario
- Test by adding data to the Google Sheet and seeing that data in HubSpot
Create an Integromat Account
Easy peasy - sign up for a free Integromat account. I recommend using Google Sign In, but that’s up to you. See how their pricing works here - they offer a ton of functionality and limit based on data usage, not on features. Feel free to do their onboarding walkthrough, or skip.
Create a new Integromat Scenario
A Scenario is where we setup the app connections, logic and steps of our integration. Scenarios can be scheduled or triggered, which is helpful if there are certain times when an integration needs to poll an API for changes. Integromat also supports webhook based triggers where they provide you a webhook URL to send data to. This could be used in something like a HubSpot Workflow, where you webhook the data from the Workflow to the integration scenario. But for now, we’ll use Google Sheets as the trigger app. Let’s create the Scenario
We will create the initial shell of the integration scenario and the starting condition
- On the Integromat Dashboard > open Scenarios > Create New Scenario > Add Google Sheets. Note: the following gif uses an already authorized Sheets account, you will do that in the next step
- Click on the Starting trigger like in the gif above. Authorize Google Sheets to your G Suite Account.
- Since our use case example is a list of webinar attendees, stage a sheet with this sample data in your Google Sheets account. Recommend making a copy of this sheet for usage as a sample data set.
- On your starting trigger, choose Google Sheets and then choose the ‘Watch rows’ trigger and complete the conditions, choosing the sheet you just cloned.
 Note: the screenshot alters the ‘limit’ parameter, for this exercise, choose a limit larger than 3
Create a HubSpot Developer Account and prepare the oAuth connection
Due to certain HubSpot APIs being limited to oAuth as their authentication method (such as the Timeline API, CRM Cards and Webhooks), we’re forced to create our own app to authenticate to HubSpot. Integromat does have an out-of-the-box HubSpot connector that you can authorize for a slew of other standard integration triggers and actions, however we’re not using them (or the HubSpot CRM app connection) in this tutorial.
- Sign up for a HubSpot Developer Account, or log-in to your existing account
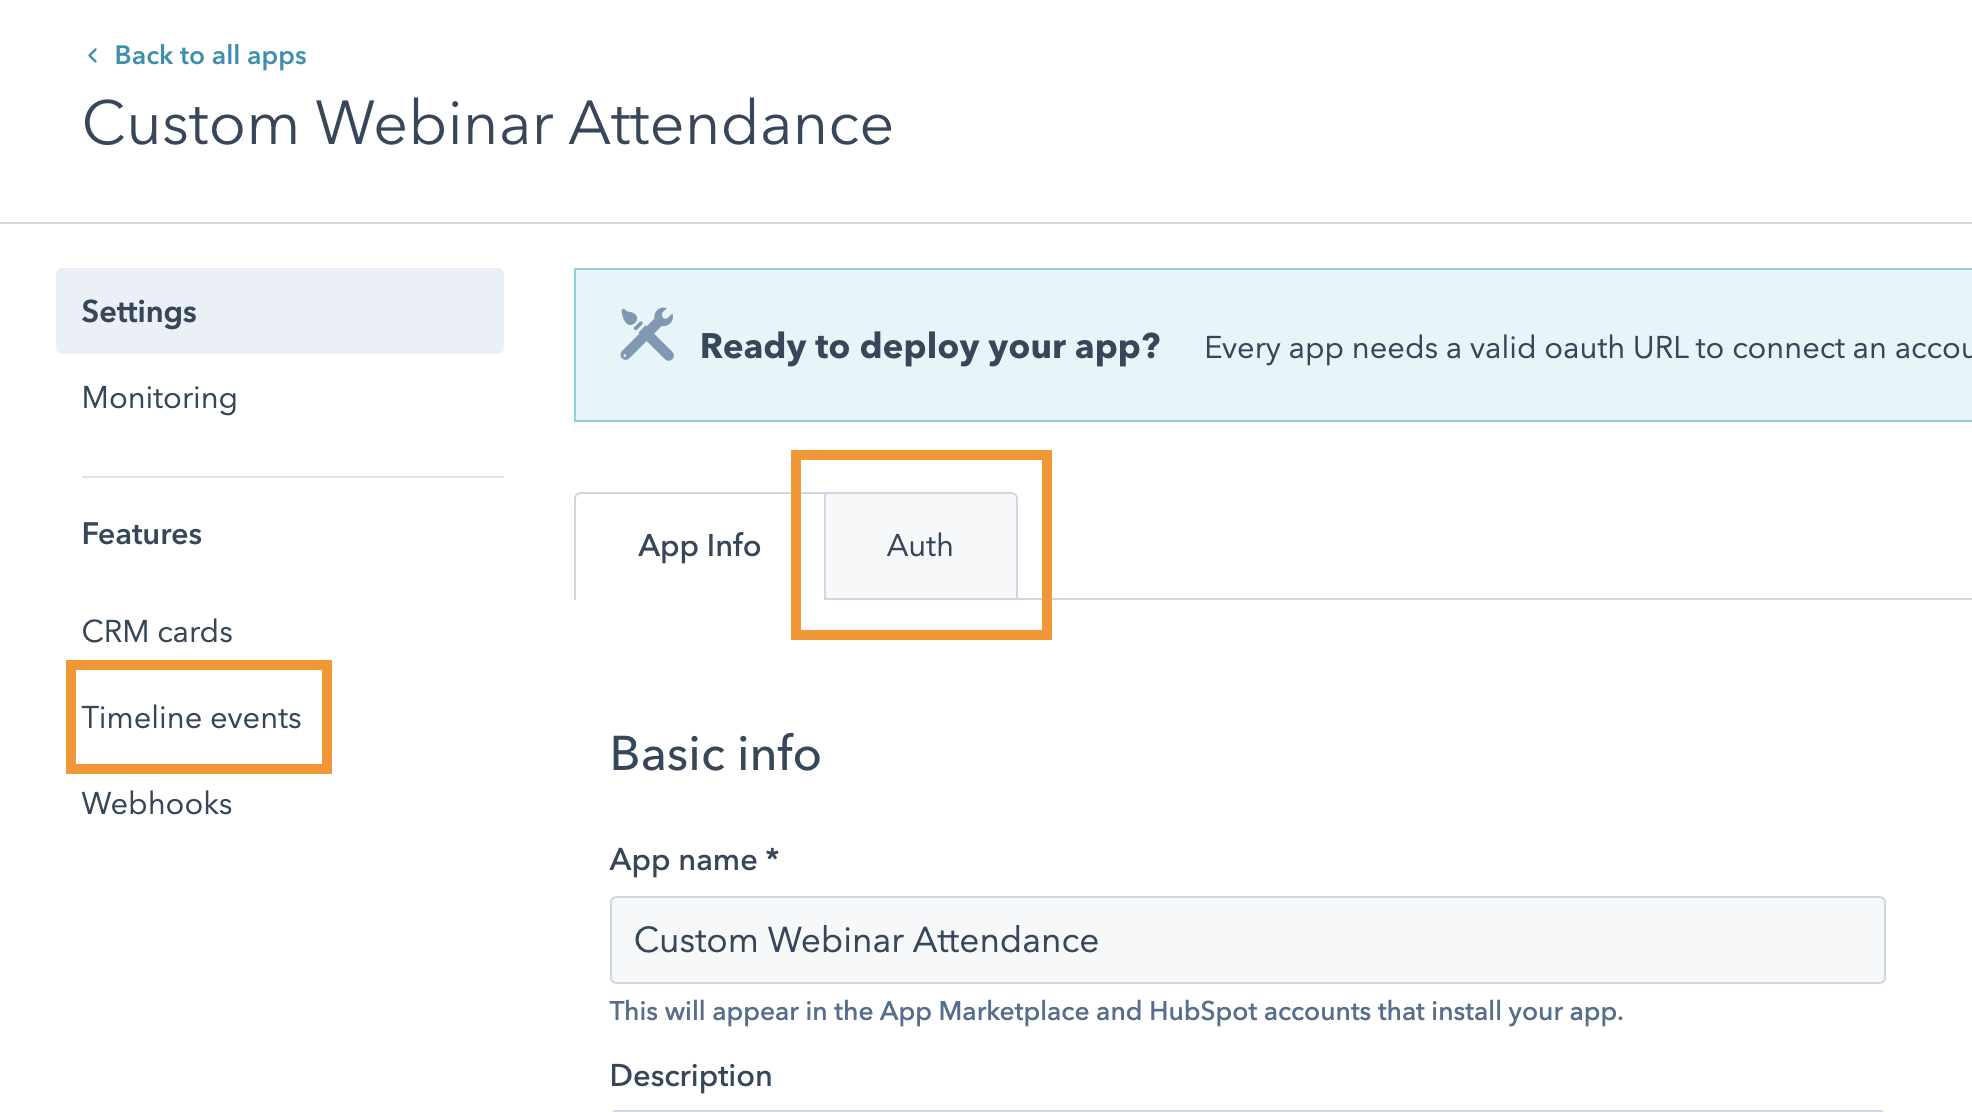
- Create a new app and name it like “Custom Webinar Attendance”
- Familiarize yourself with the resulting screen. We’ll use the ‘Auth’ tab and the ‘Timeline events’ section
Next, we’ll create the HTTP connection using oAuth 2.0 as the authorization method. This set of steps is one of the features that sets Enterprise grade iPaaS from others. The gist is that we’ll create a new HTTP connection in Integromat and provide it several configuration options and secret keys provided by your HubSpot developer portal app. The HubSpot app needs to be configured for the correct scopes (scopes grant the integration access to only certain data in HubSpot).
- In Integromat, on the bottom toolbar, add a new app connection. Find and choose HTTP (conveniently right above HubSpot CRM!)

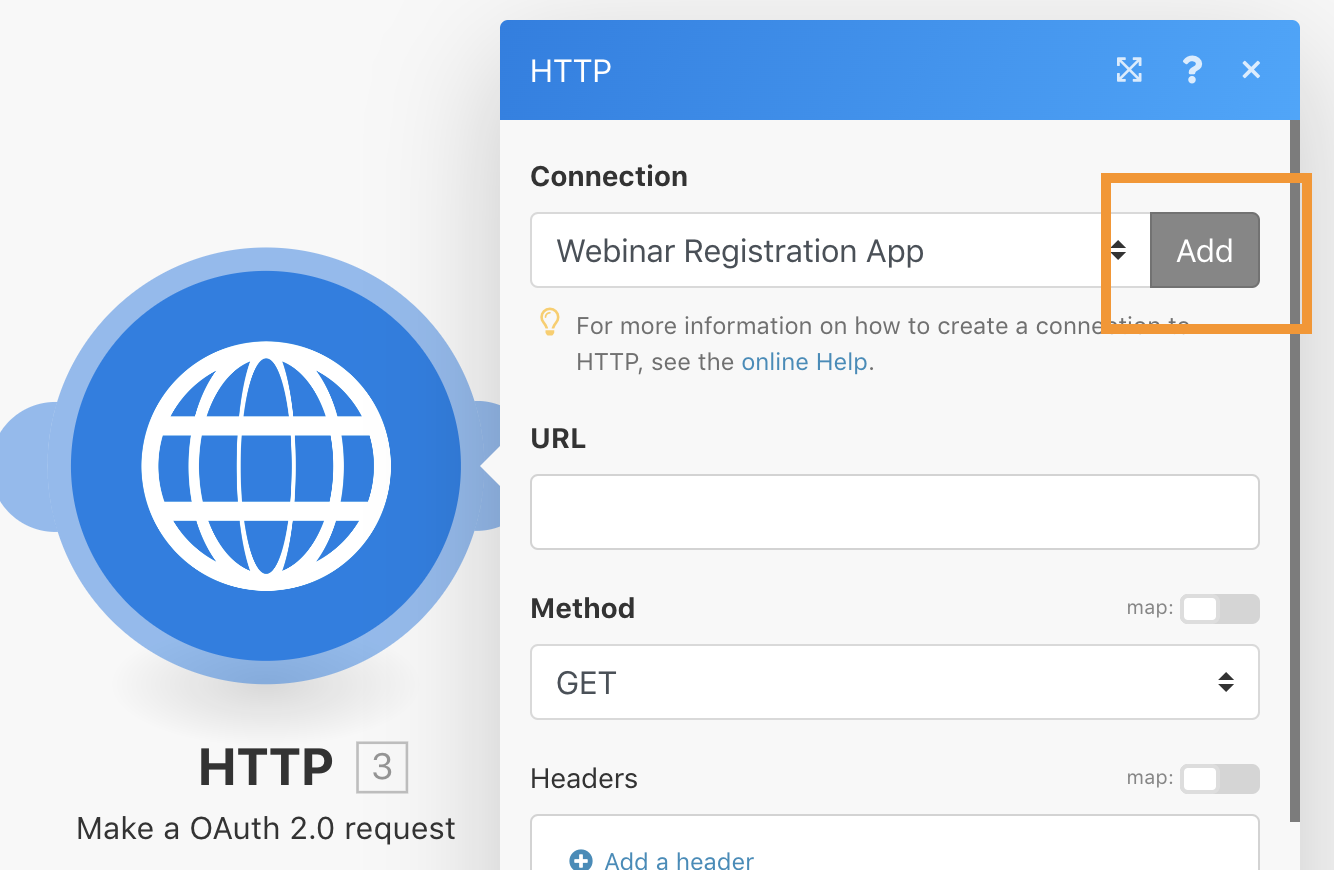
- Click into the widget and choose “Make oAuth 2.0 Request”

- ‘Add’ a new connection
Most of the details to add for the oAuth connection are provided to us by our HubSpot app. Navigate back to your HubSpot Developer portal and click to the ‘Auth’ tab 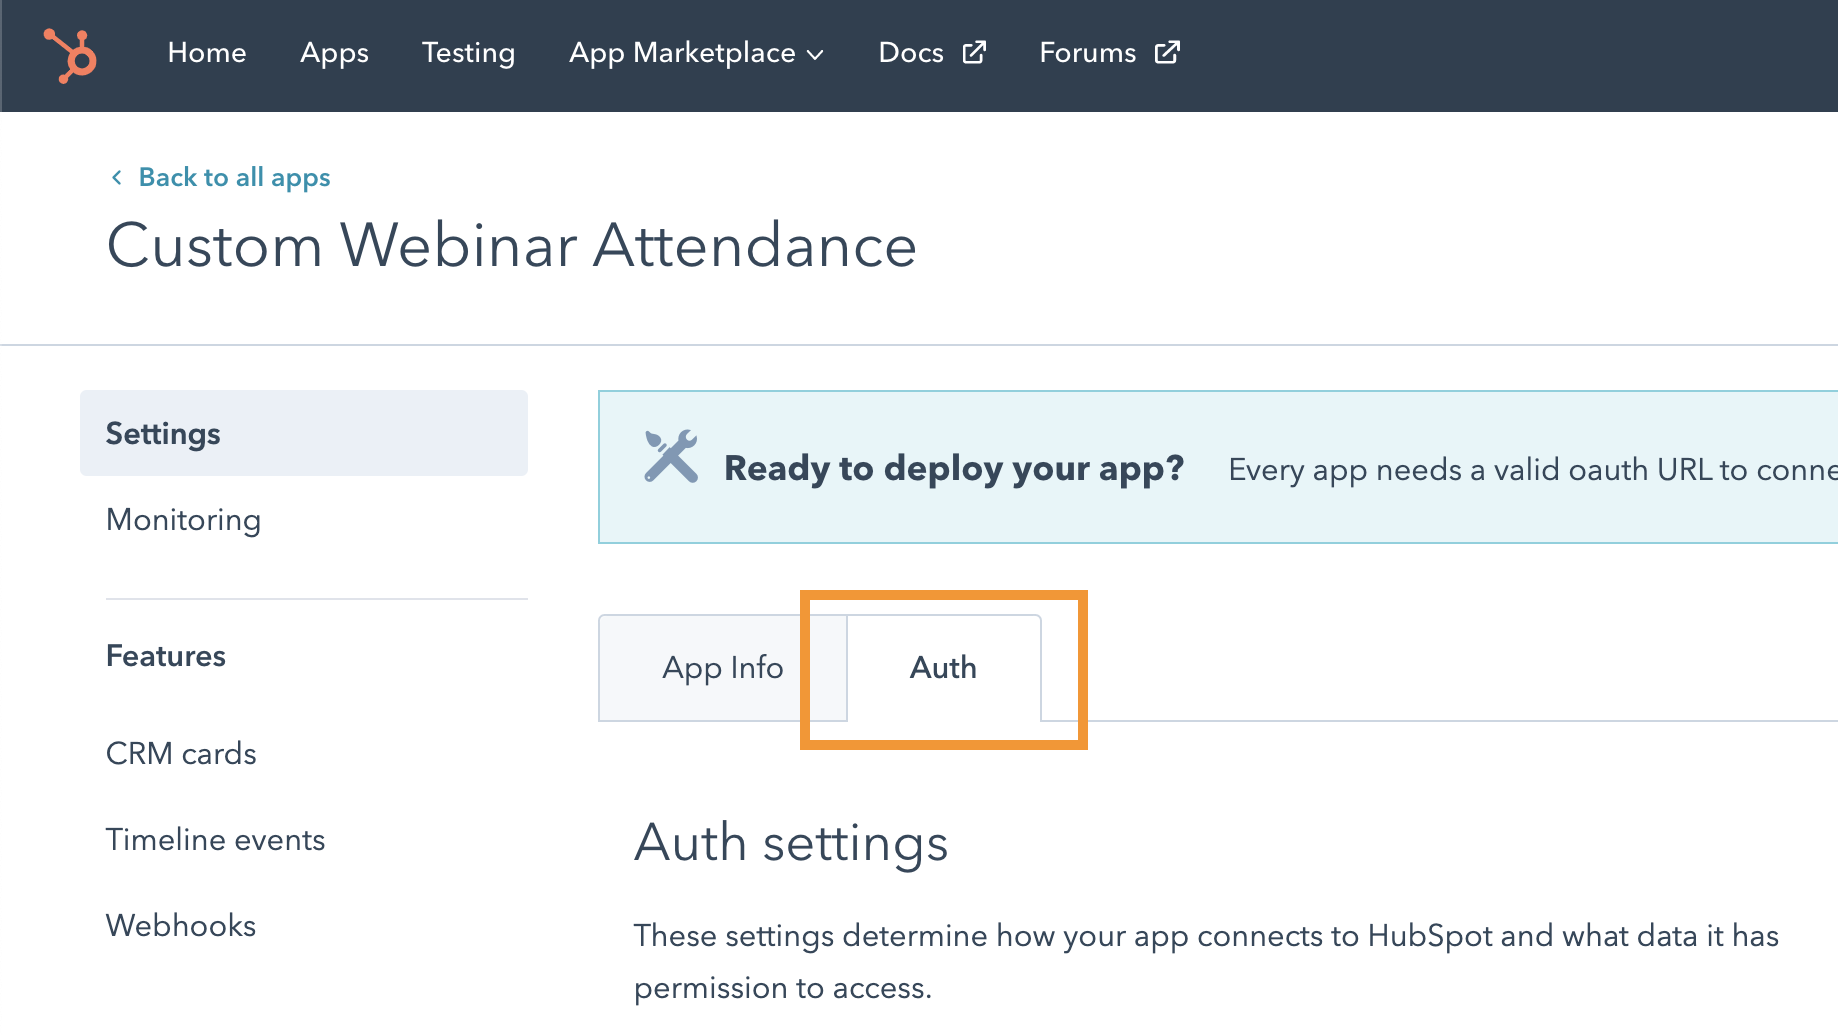
- Scroll down a bit and start by adding a redirect URL. Integromat provides this for us in this case. Paste in
www.integromat.com/oauth/cb/oauth2 - Then add scopes for
contacts,oAuth,timelineandintegration-syncand then Save changes. .
.
Next, you will need theclient idandclient secretfor your app auth in Integromat. Copy them one at a time and paste in Integromat. Note: theclient secretshould never be shared publicly - this is the hidden key that should only be used in server-side applications.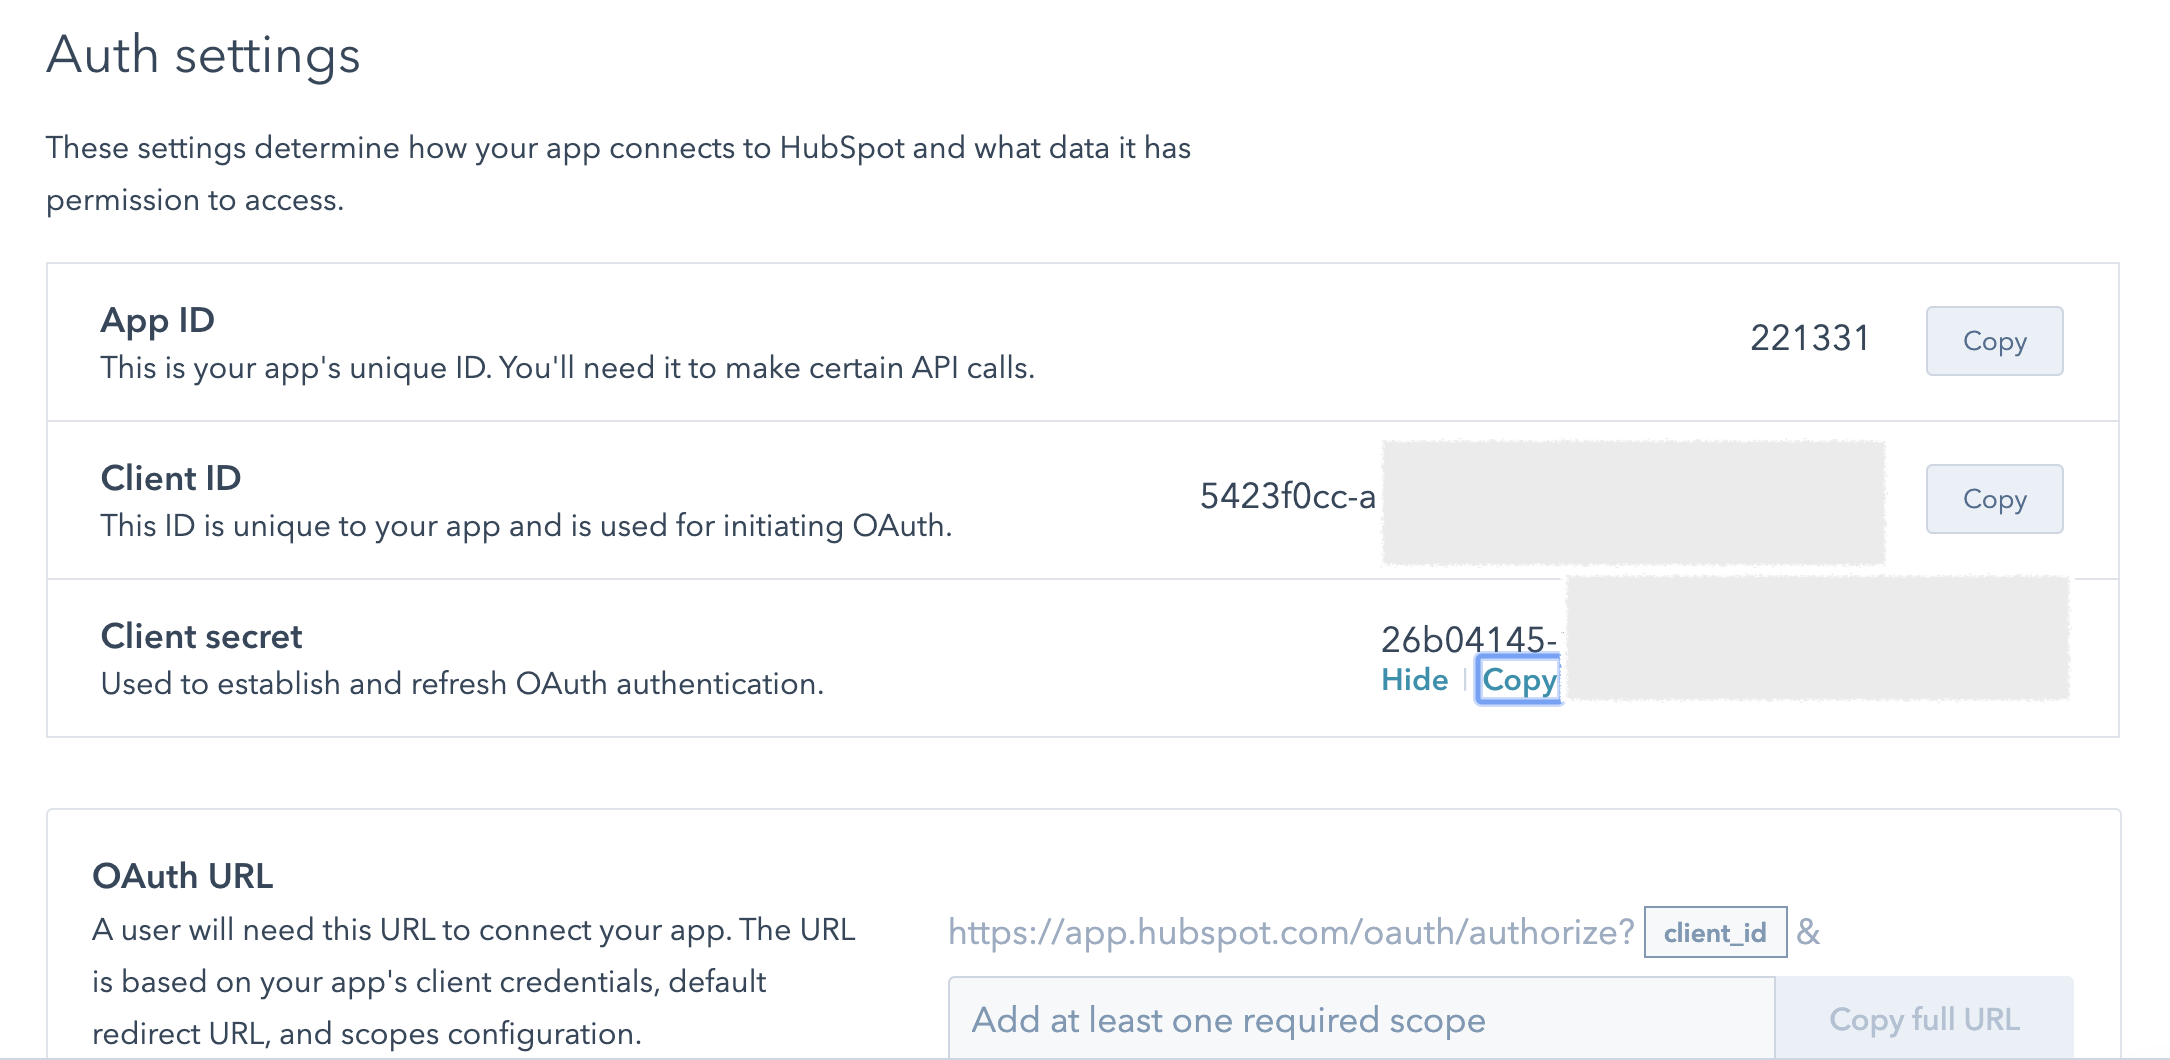
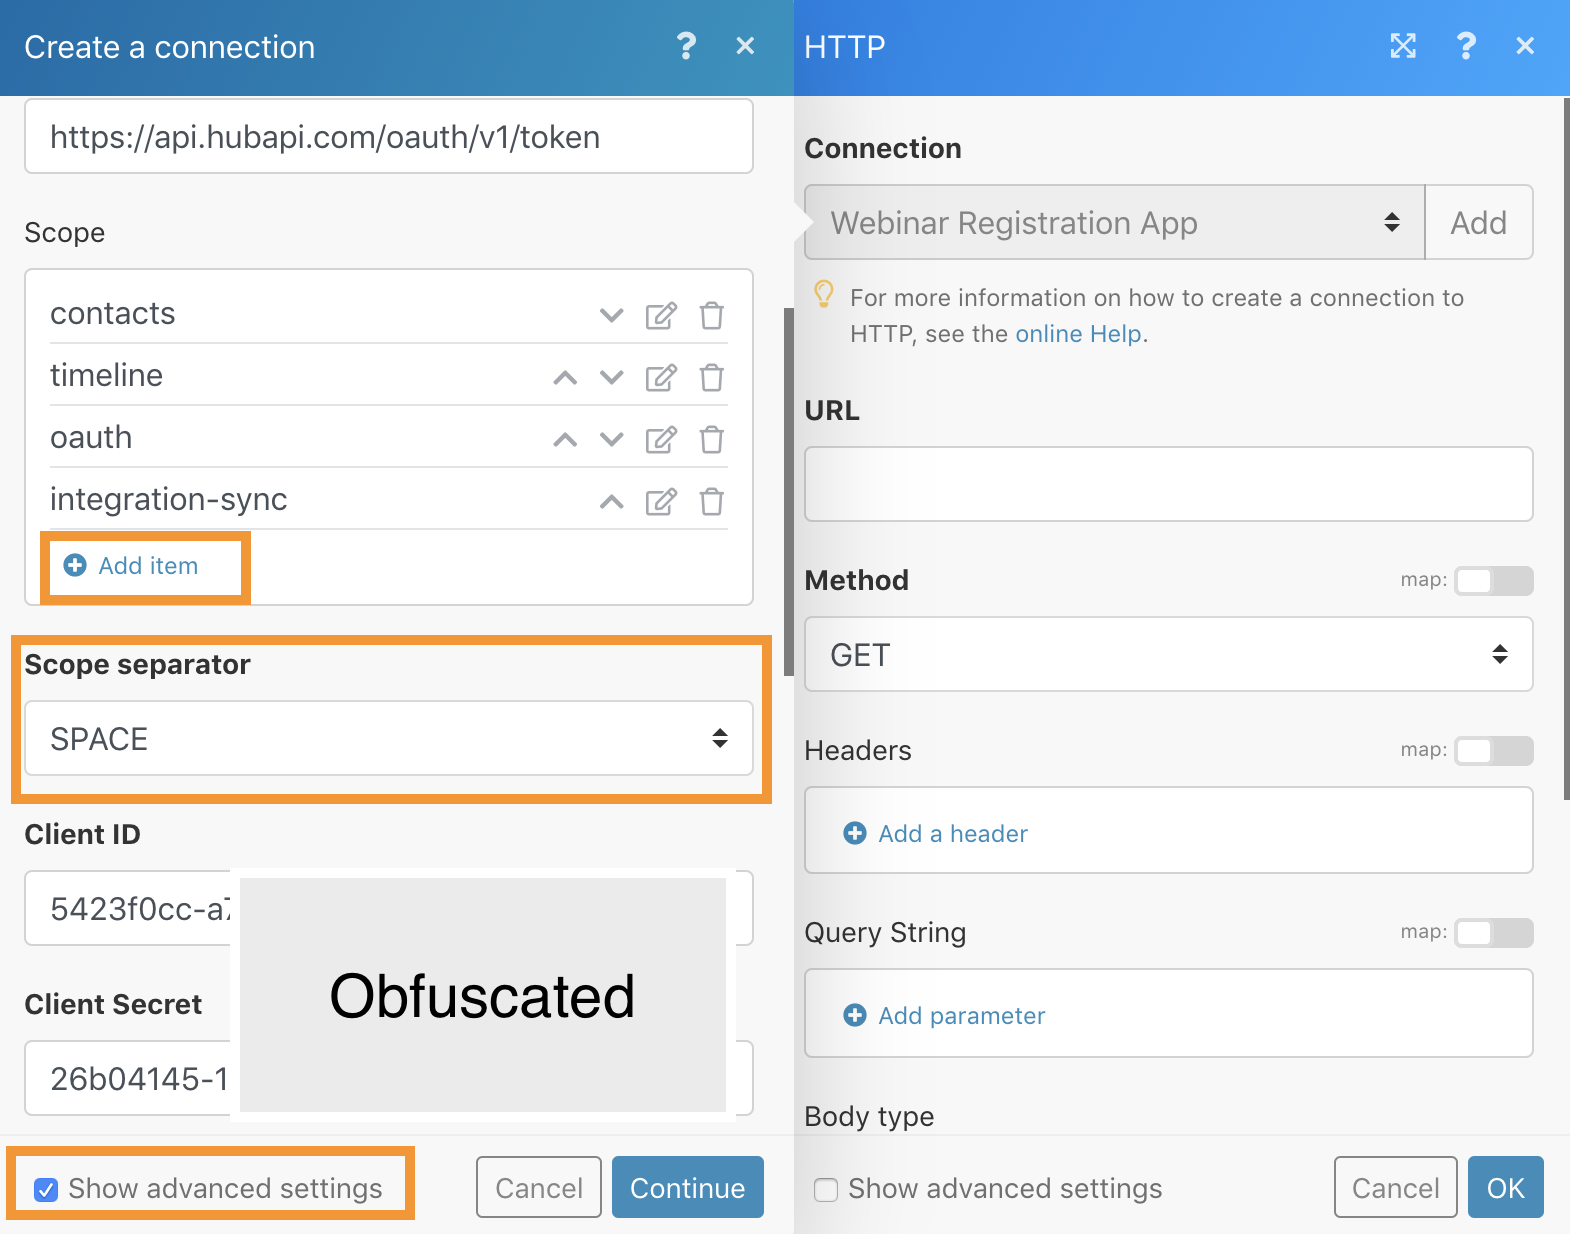
To complete the oAuth connection, in Integromat add the following:
- Name your connection, it can be anything, but maybe
HubSpot Webinar App - Authorize URI:
https://app.hubspot.com/oauth/authorize - Token URI:
https://api.hubapi.com/oauth/v1/token - Add scopes of
contacts,oauth,timeline, andintegration-sync- these must exactly match the scopes chosen in your HubSpot app! - Copy and paste the
Client IDandClient Secretfrom your HubSpot App - Click
Show Advanced Settingsand change Scope separator to Space - When complete, the
Create a connectiondialog should look like these two screenshots: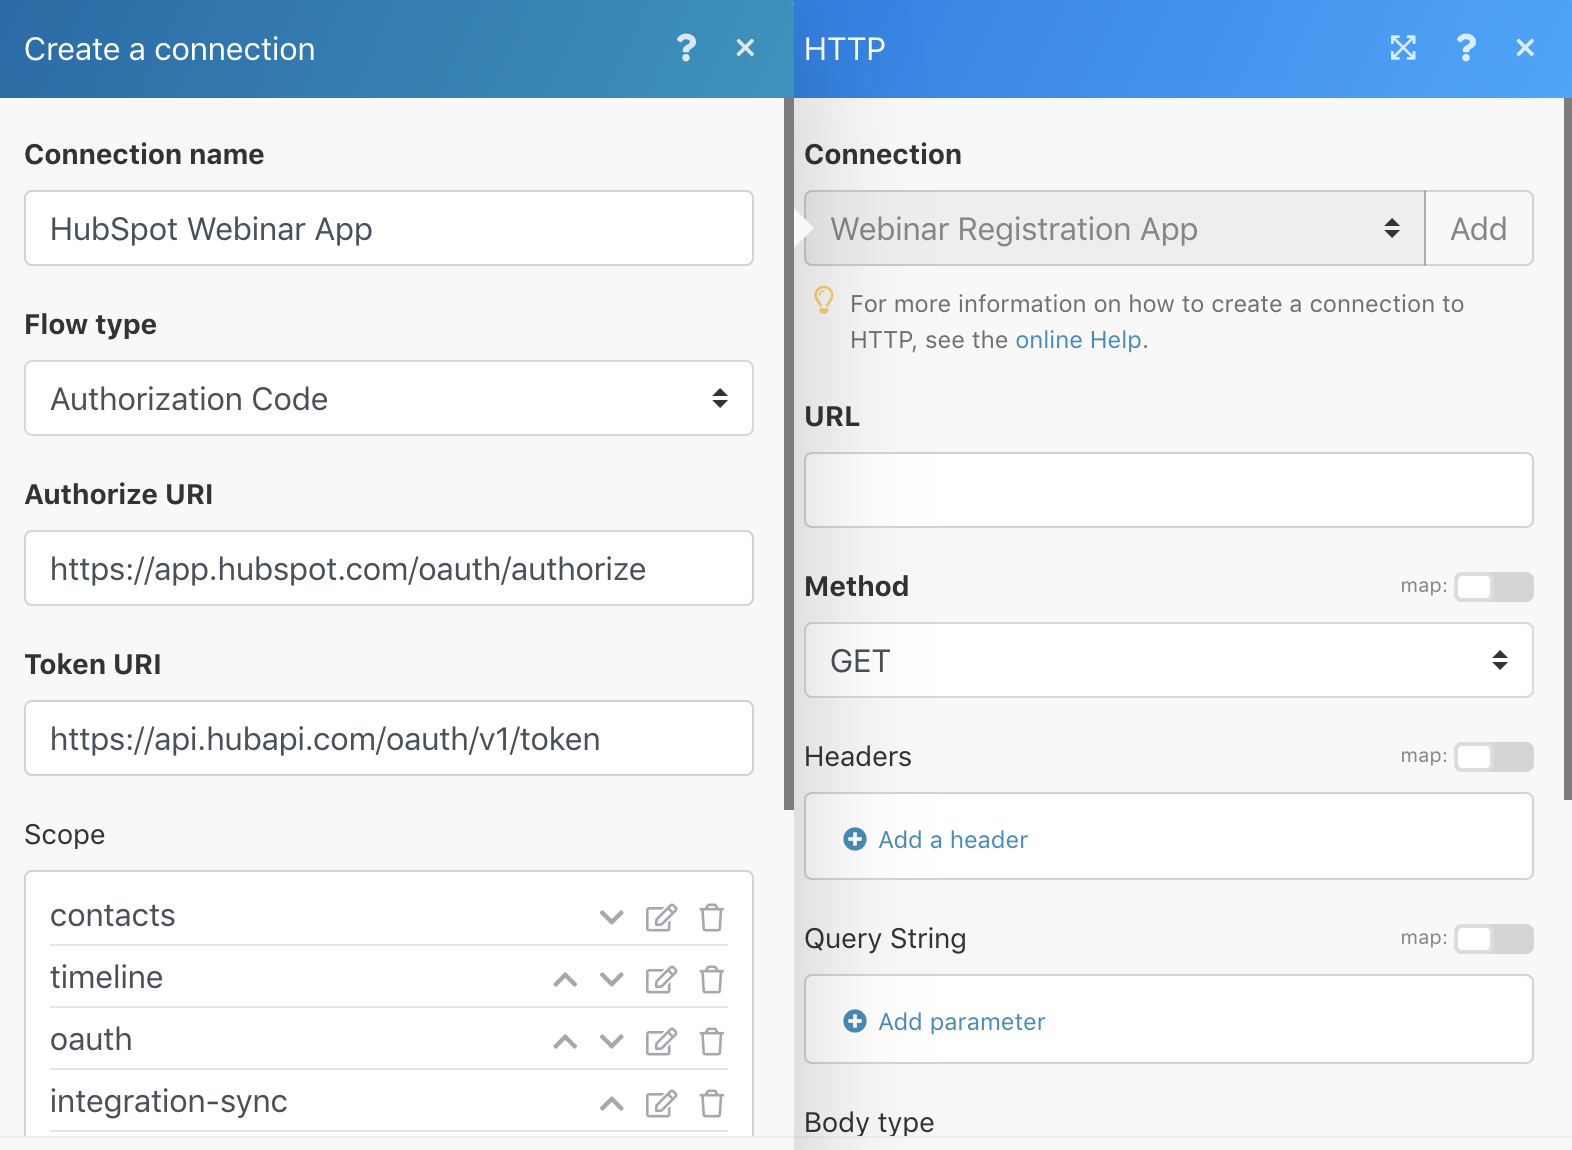
- Click
Continueand you will be prompted to log-in to HubSpot, and then to Grant access to the app - choose the portal you want the integration installed into - that could be your personal portal or a test portal.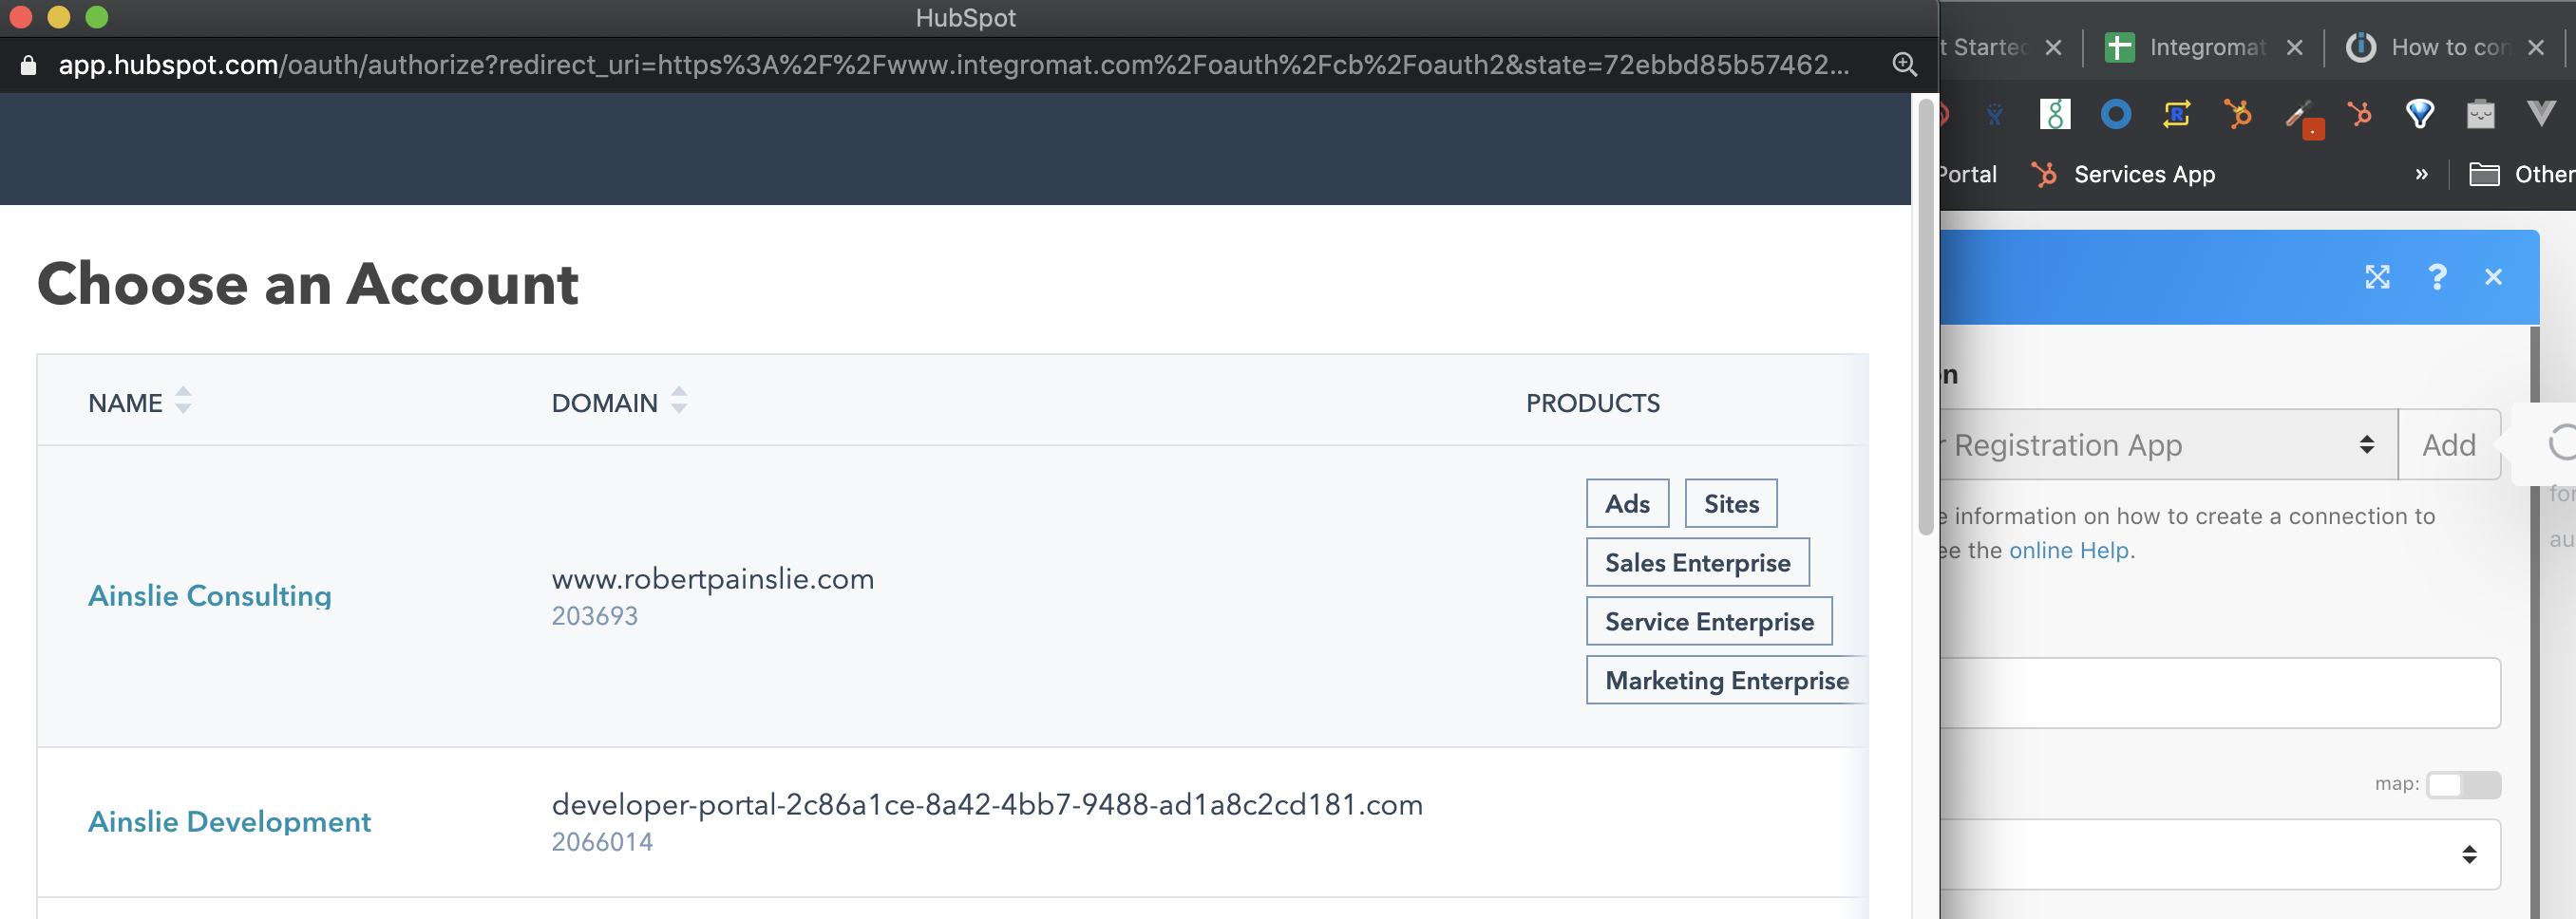
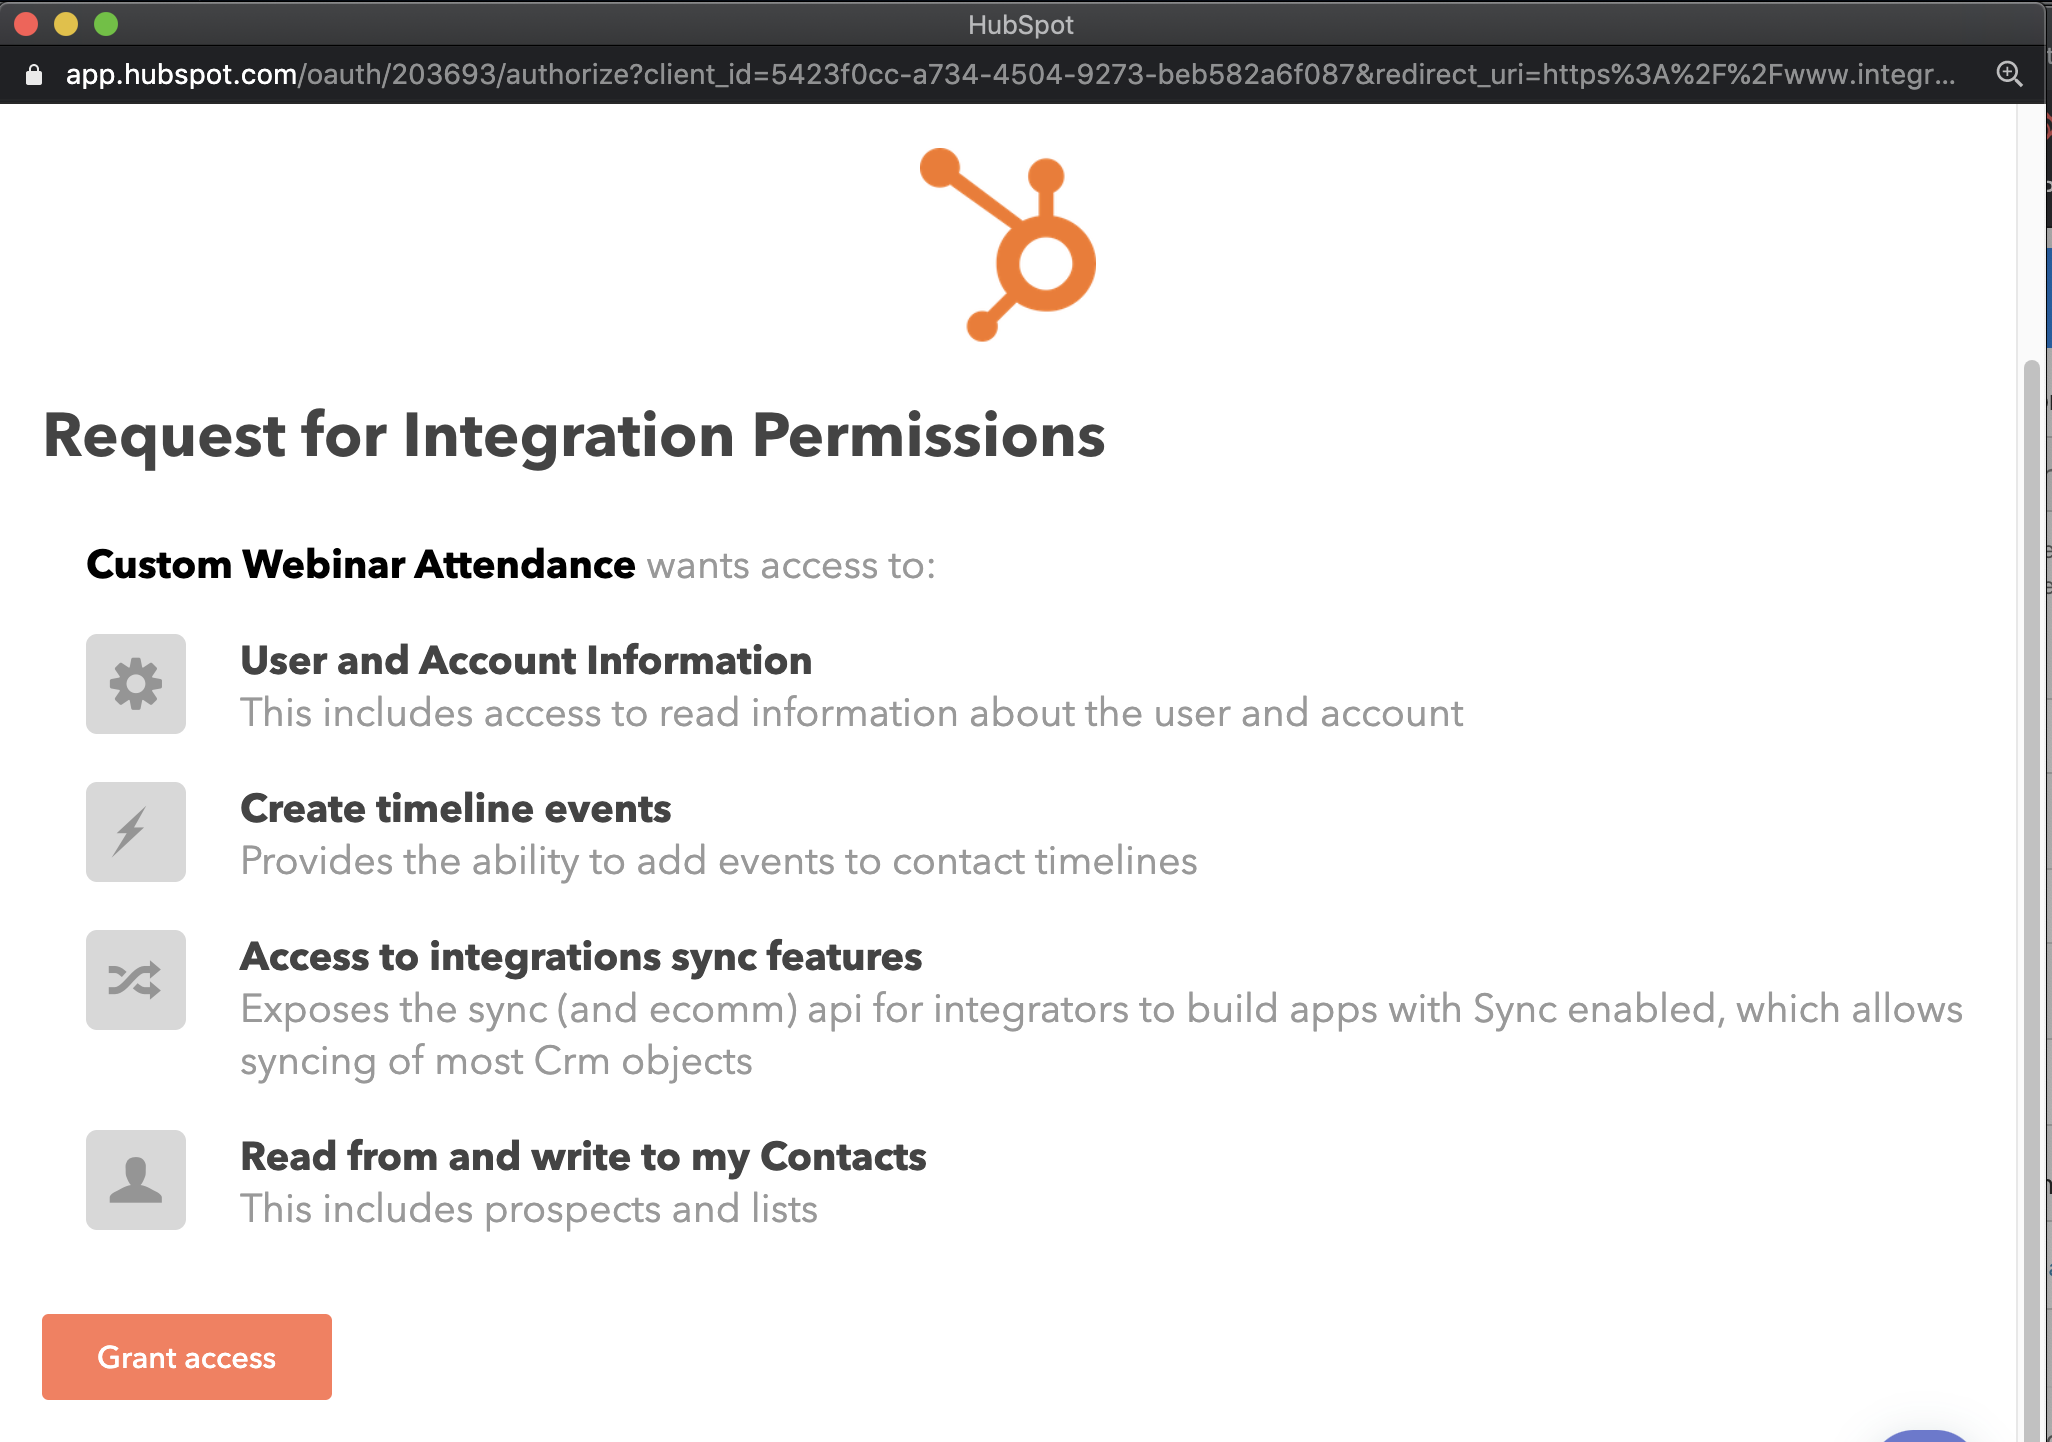
Congrats, you just setup an oAuth app in a HubSpot portal! Celebrate!
Setup the Timeline Event Data Structure in HubSpot and Integromat
Next, we will create a new Timeline Event type in our HubSpot app. Once created, you will see additional segmentation options in HubSpot Lists, Workflows and Lead Scoring
- Navigate to the ‘Timeline Event’ section of your HubSpot app and create
New event type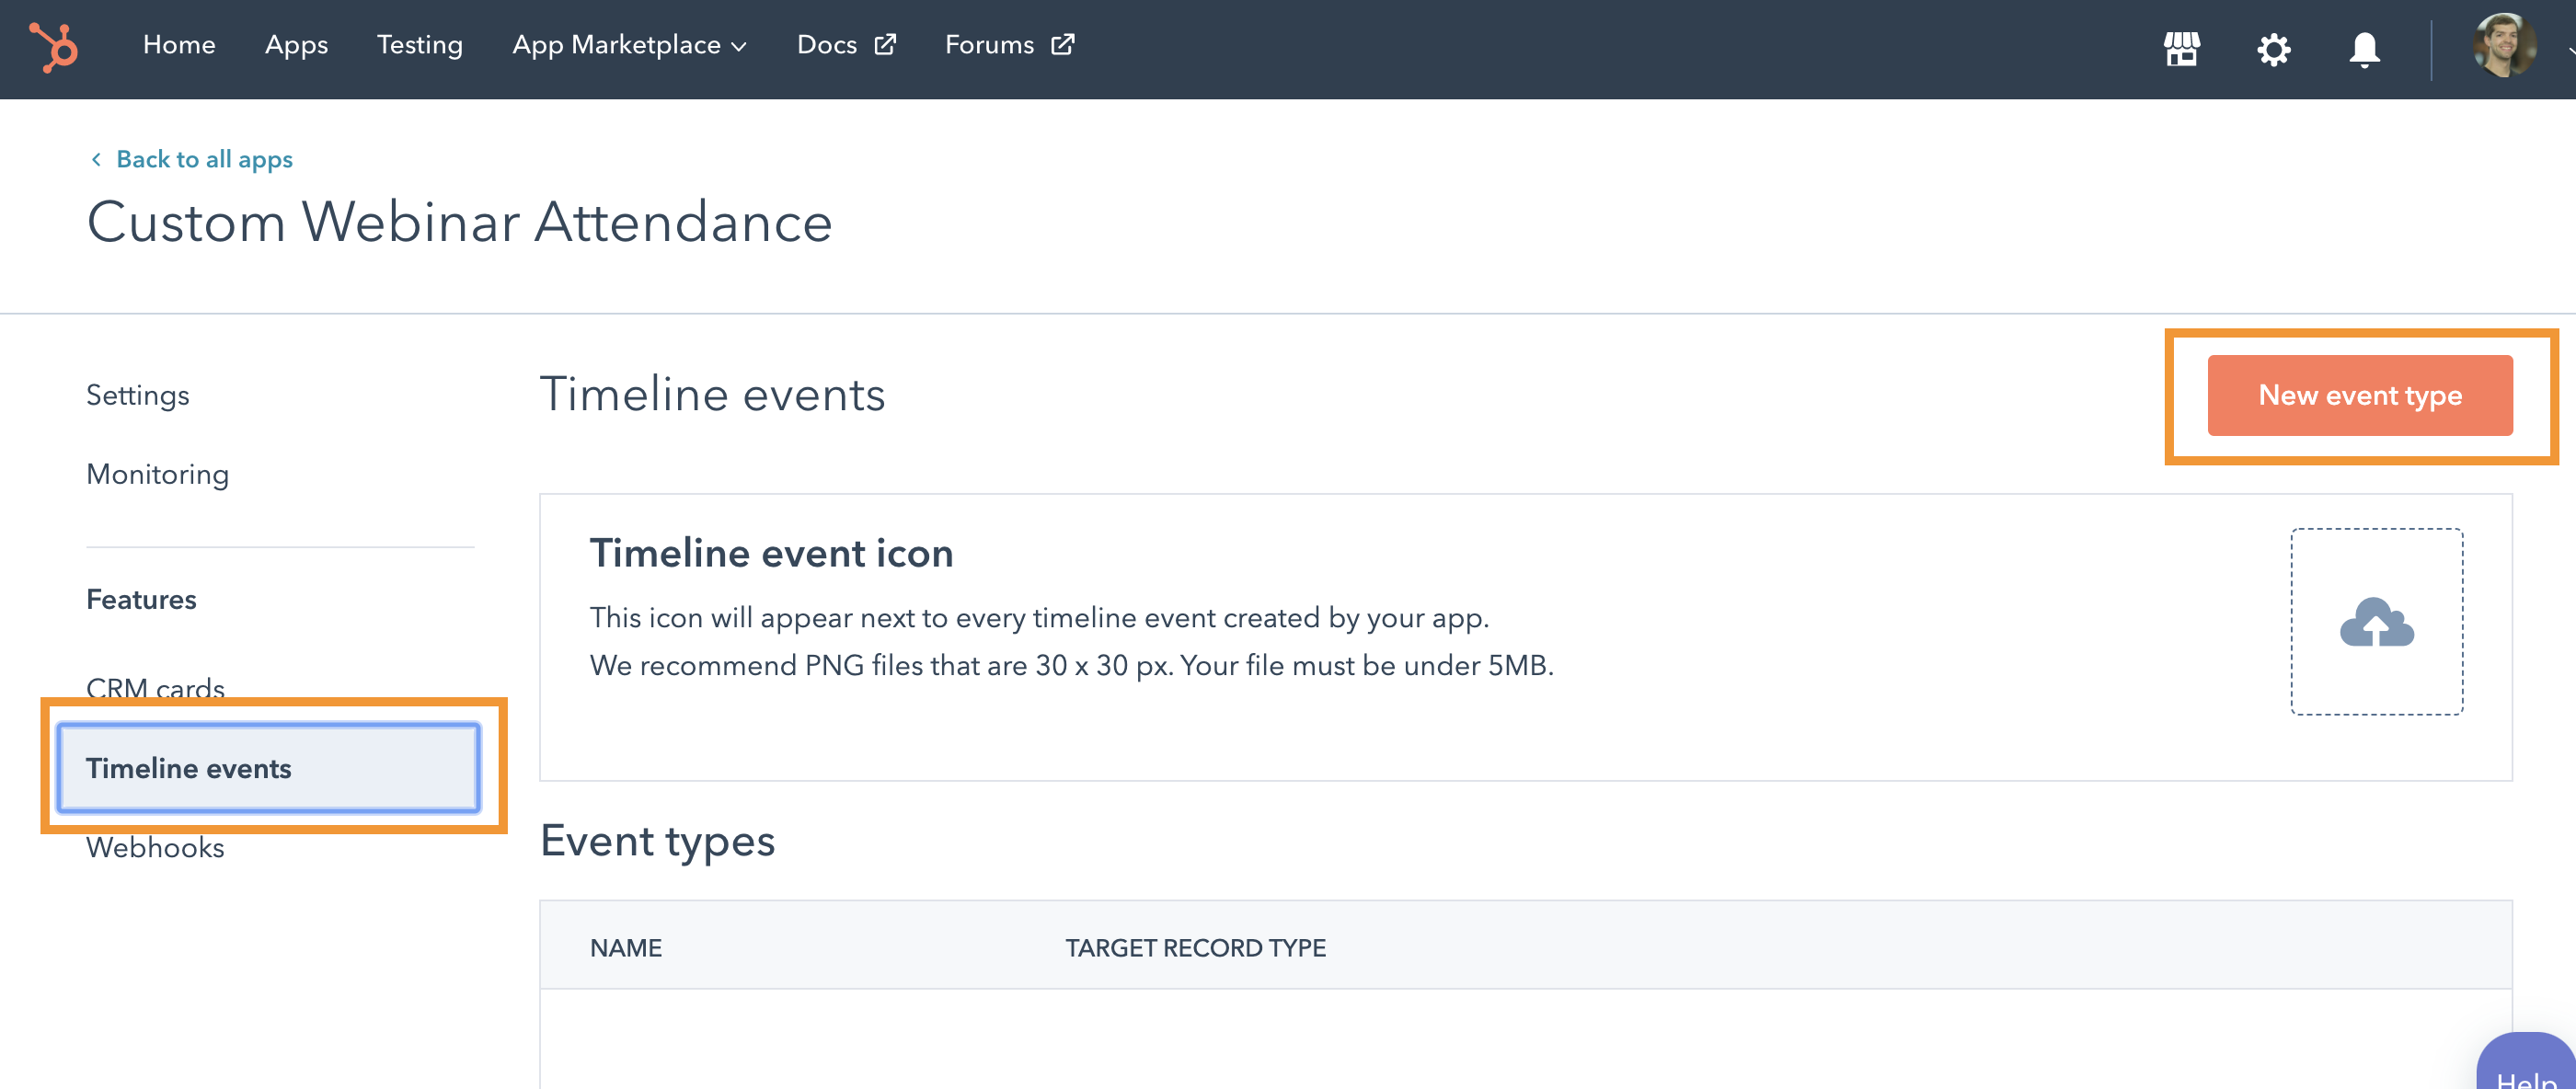
- Name your event type
- On the ‘Content’ tab, choose Target Record Type of
Contact - Flip to the ‘Data’ tab and Add new property. Give a field name of
webinar_nameand a data type ofString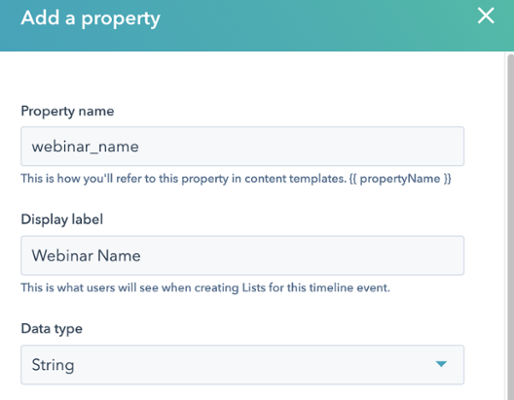
- Add 3 more properties:
- Property name:
webinar_date, data type:Date - Property name:
webinar_presenter, data type:String - Property name:
webinar_category, data type:Enumeration, options:lead_gen,tutorialandcustomer_marketing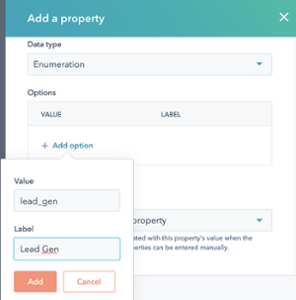
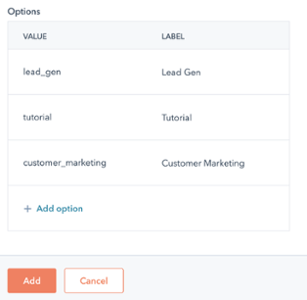
Once all properties are added, the screen should look like: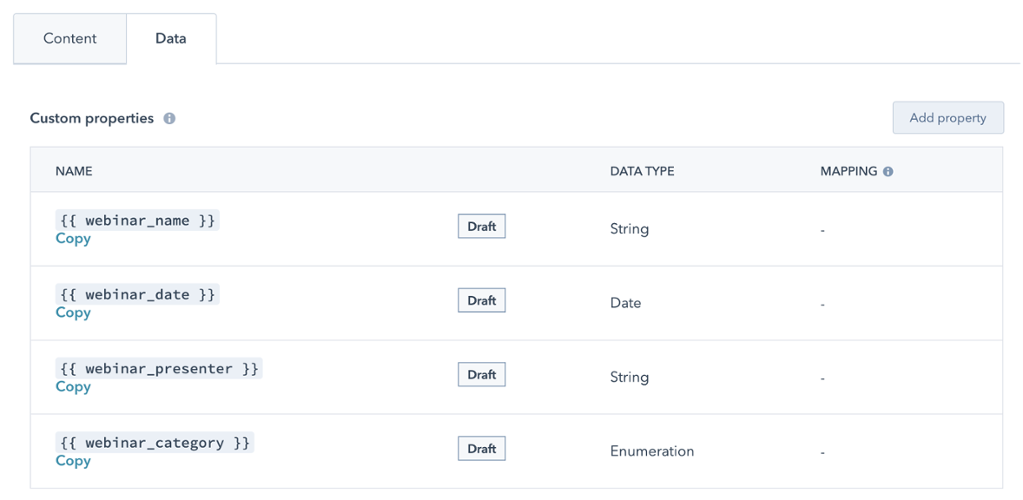
- Flip back to the
Contenttab and edit the Header template and Detail template. Copy and paste the following:
Header template:
Detail template:Webinar attendance: {{webinar_name}} on {{#formatDate webinar_date format="short"}}{{/formatDate}}This event was created on {{#formatDate timestamp}}{{/formatDate}} **Webinar Name**: {{webinar_name}} **Webinar Category**: {{webinar_category}} **Webinar Presenter**: {{webinar_presenter}} **Webinar Date**: {{#formatDate webinar_date format="short"}}{{/formatDate}} - Click
Create. Your Timeline Event Type should look like this:
Whew. Now, we’re really ready to rock and roll
Navigate back to Integromat, and in the template details for the ‘Make a OAuth 2.0 request’, input the following:
- URL:
https://api.hubapi.com/integrators/timeline/v3/events - Method:
POST - Body type:
Raw - Content type:
JSON (application/json) - For Body, copy and paste the following. You will need to edit the ID in the
eventTemplateIdto match the event ID in your HubSpot app (screenshot below)
Copy the{"eventTemplateId":"1005087","email": "{{1.`0`}}","tokens":{"webinar_name":"{{1.`1`}}","webinar_date":"{{formatDate(1.`2`; "x")}}","webinar_category":"{{1.`4`}}","webinar_presenter":"{{1.`3`}}"}}evetTemplateIdand replace in the above body: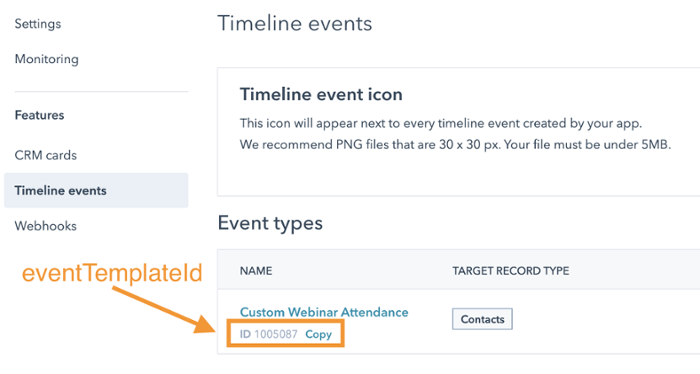
Note: When you paste the body into the Integromat request, make sure there are no spaces or unintentional linebreaks - the formatting of therawrequest can be finnicky - the above should work. (Integromat does have a handy ‘JSON’ action step to better format common JSON bodies, but we aren’t using it here).
The finished request in Integromat should resemble this:
Review the pieces and run the integration scenario
Before running your integration scenario, double check these pieces:
- Authorized Google Sheets account
- Starting Google Sheet’s trigger is using a copy of the provided sheet
- The HTTP Request action is authorized via oAuth 2 to an actual HubSpot portal
- The Event type in your app has all of the proper properties and Event templates
- The HTTP Request has the right settings to make the POST request
Assuming all of the pieces are in place, click the ‘Run Once’ button in the bottom right of your Integromat Scenario and then view the output logs:
If your output received a 201 response code, go find the contacts in your HubSpot portal and inspect the timeline (you may need to select the integration in the Contact Timeline filters):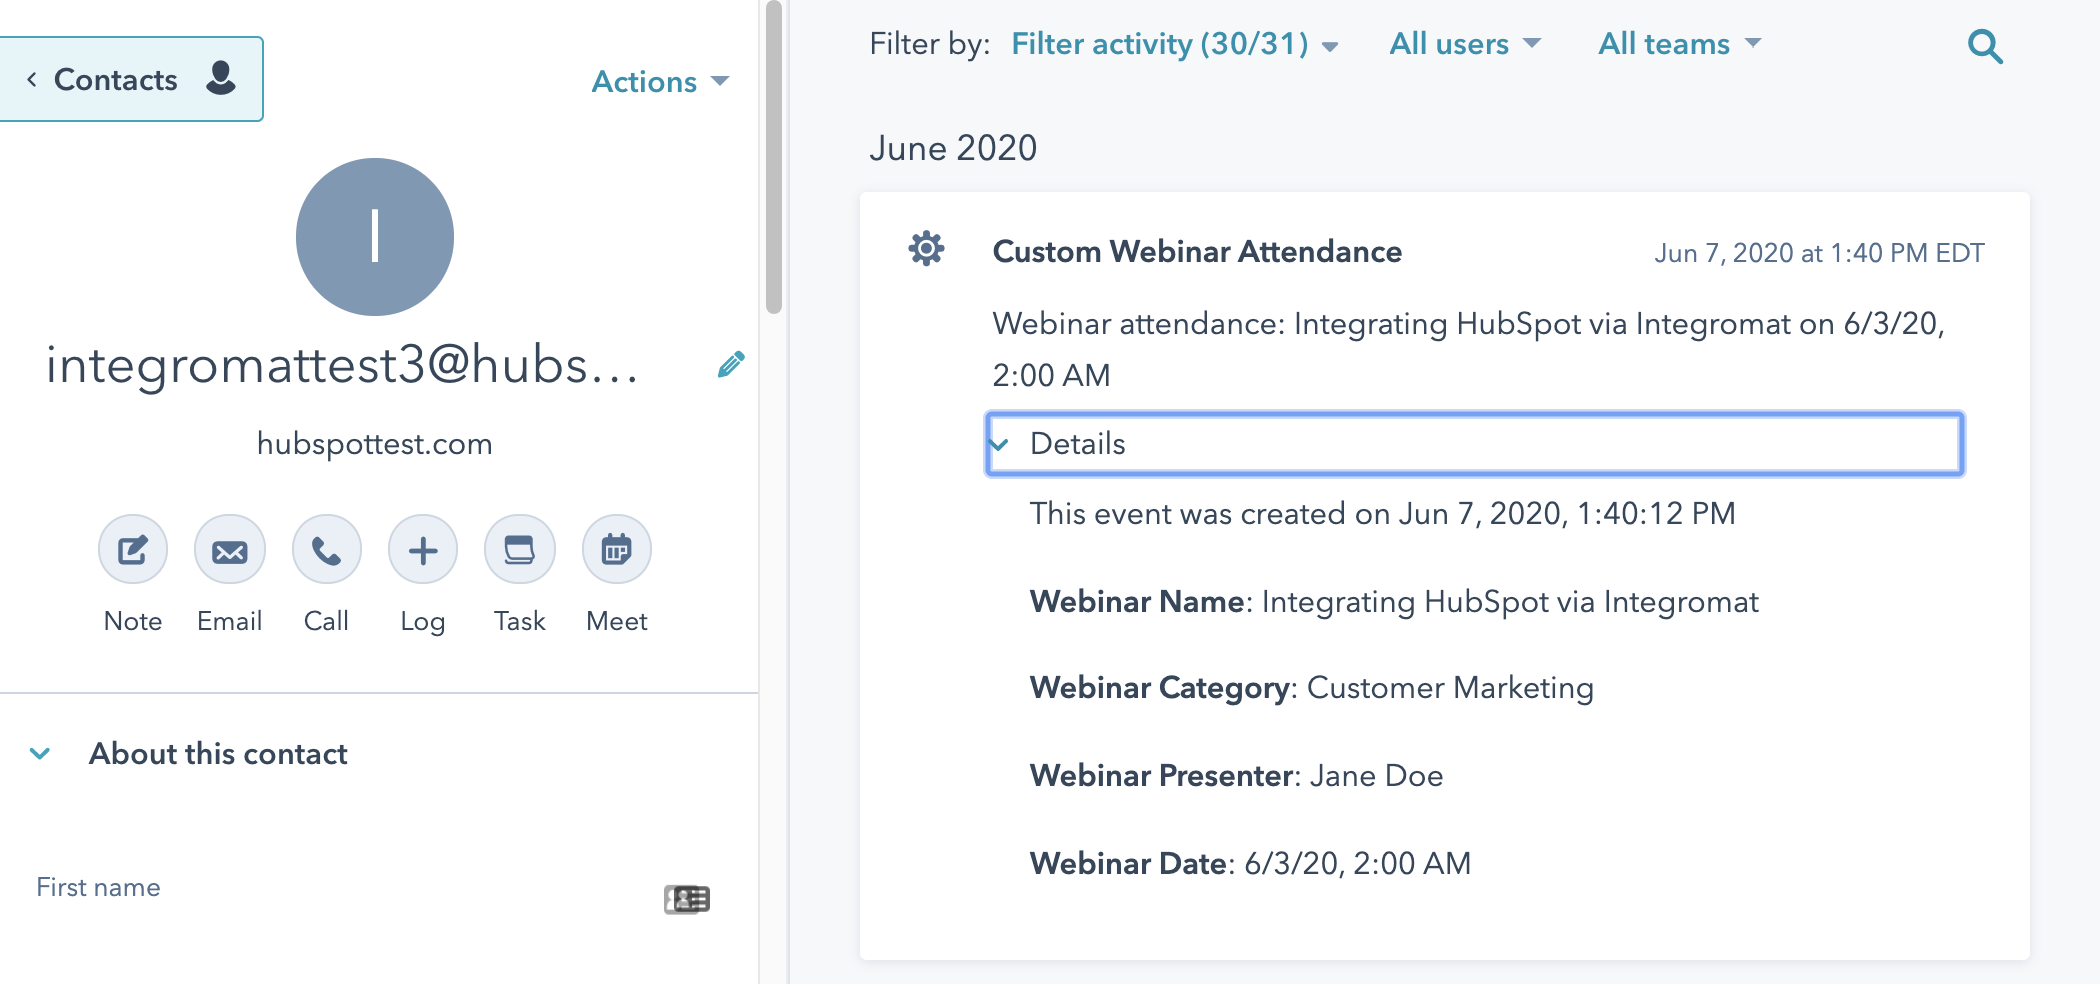
If you need to troubleshoot, copy and paste new rows into the Google Sheet and then run the scenario again, using the output logs to troubleshoot.
You did it! You integrated to the HubSpot Timeline!
Some random final notes:
- The Integromat Google Sheets trigger iterates every new row for you, however, some apps and data need to have a step that has an iterator, running a loop for every record (and making one HTTP request per item). Understanding your data sources and outputs is critical
- This tutorial provided one sample use case, but the possibilities are vast - what would you solve by sending data to the Timeline?
- One feauture of the Timeline API we didn’t use is the ability to copy timeline event data into a property. This way, you could send a timeline event, copy an event property to a contact property, and then personalize on that data. The property would be overwritten everytime there is a new event though.
- In the future, Custom Objects may be a better fit for this type of data modeling, but it’s a case-by-case basis on whether something is an ‘Event’ or a custom object record
- Integromat is a great service, but for large data volume jobs, it might not be the best option due to their pricing as well as the fine control you may need. However, for smaller customers or for less data-intensive jobs, it can be a great option instead of tools like Zapier or more expensive alternatives like Workato or Mulesoft.